
What if by the magic of automation, you can run your machine learning training or prediction on a remote server just by typing three or two commands lines, without going through the hustle of connecting to your virtual machine, configuring your Python environment, uploading your data and doing all those repetitive tasks again and again. With all the existing cloud platforms like GCP, AWS or Azure, this use case is handled really well by a variety of existing solutions they offer, that's been said it's not always the right fit for you if for example you're the only "data guy" on your team with a very very restricted budget and your boss is only allowing you one GCP VM to work with and you've got a love hate relationship with data engineering...you know, the "common case".
Fabric2 can be a good fit for this task. What is Fabric2 you will ask, it's a Python library that gives you the possibility to run shell commands on a remote machine over SSH. So with the use of Fabric2, I can train a model on a remote server, which I've never configured before, just by typing on my local shell the three following commands :
fab2 prepare-os
fab2 prepare-menv
fab2 train-model --dataset=<link_to_train_data> --epochs=50
The first command will install all needed packages (like installing Python itself) in the remote server, the second one will upload the needed assets for the training and will create Python virtual environment with the required libraries and then the last command will do the proper training and download locally a copy of the final model.
As you can see on the third command, we can add arguments to customize our function and make it as adaptive as possible like specifying the train dataset and an argument of how many epochs we'll need.
fab2 train-model --dataset=<link_to_train_data> --epochs=50
I will show you how all this works and you can use it yourself by adapting the code I've written on this github repo.
Use case scenario
My use case scenario her is the design of a MNIST Autoencoder, which I will use to generate autoencoded images. I will automate this process, so I can in any Ubuntu server (18.04 LTS) run the training, get the model and generate autoencoded images to be retrieved to my local machine.
Installing Fabric2
To install Fabric2, you can use pip to do so:
pip install fabric2
Assets & Project Layout
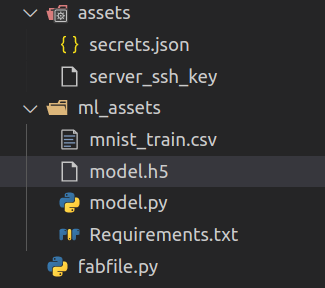
The project root will contain three main elements :
fabfile.py: it is the file containing all the tasks automating our workflow. It is important to have this name, so when runningfab2at the project root it will recognize which file contains the list of tasks.assets: it's the directory containing elements and information related to remote server authentication or any relevant data to use for the distant machine, as encryption keys, passwords, hostnames or username.ml_assets: this is the directory containing our assets related to the machine learning model, like the model itself, requirements to install into the virtual machine or the training data. it's the only folder to be uploaded to the remote server.
This is the layout that I've adopted for this project, feel free to adapt it better to your needs :
.
├── fabfile.py
├── assets
│   ├── secrets.json
│   └── server_ssh_key
└── ml_assets
    ├── mnist_train.csv
    ├── model.py
    └── Requirements.txt
Before discussing the creation of tasks in fabfile.py, we will first tackle the content of our assets folders, assets and ml_assets.
assets folder
├── assets
│   ├── secrets.json
│   └── server_ssh_key
The first file is secrets.json, as its name suggests it contains our little "secrets" mainly session passwords, SSH Key passphrase and anything you think is sensitive and doesn't have to show up on your code.
{
    "password" : "<password>",
    "passphrase" : "<passphrase>"
}
This folder also contains the encryption key, so you can securely access your remote server if needed. For this matter, you have to make sure that you're not tracking this folder in git and it is well included inside your .gitignore.
ml_assets folder
└── ml_assets
    ├── mnist_train.csv
    ├── model.py
    └── Requirements.txt
The Requirements.txt is very important : in addition to list the needed libraries, it helps to specify the exact version you want to use for your different Python libraries, so there is no unexpected behavior. Automation needs a kind of predictability. And in our use case, we're focused on the following versions :
pandas==1.0.2
tensorflow==1.13.1
matplotlib==3.1.3
We also have to put our training dataset, which is mnist_train.csv, inside this folder. My logic here is that the data training set is part of what defines your model, hence it has to be part of the machine learning assets.
And the last element to have is our model script model.py, which contains the two main functions train and predict. The script decide which of this two functions to use based on the shell entry arguments that we'll pass to it, as expressed in the main.
import sys
import numpy as np
import pandas as pd
import matplotlib.pyplot as plt
from tensorflow.keras.layers import Input, Dense
from tensorflow.keras.models import Model, load_model


def train(dataset, epochs):
    X_train = pd.read_csv(dataset)
    X_train.drop(columns='label', inplace=True)
    X_train = X_train.values.astype('float32') / 255
    X_train = X_train.reshape(len(X_train), np.prod(X_train.shape[1:]))
    input_img = Input((784,))
    encoded = Dense(units=128, activation='relu')(input_img)
    encoded = Dense(units=64, activation='relu')(encoded)
    encoded = Dense(units=32, activation='relu')(encoded)
    decoded = Dense(units=64, activation='relu')(encoded)
    decoded = Dense(units=128, activation='relu')(decoded)
    decoded = Dense(units=784, activation='sigmoid')(decoded)
    autoencoder = Model(input_img, decoded)
    autoencoder.compile(optimizer='adam', loss='binary_crossentropy', metrics=['accuracy'])
    autoencoder.fit(X_train, X_train, epochs=epochs, batch_size=256, shuffle=True)
    autoencoder.save("model.h5") # will save a copy of our model in the remote server

def predict(dataset):
    X_pred = pd.read_csv(dataset)
    X_label = X_pred['label']
    X_pred.drop(columns='label', inplace=True)
    X_pred = X_pred.values.astype('float32') / 255
    X_pred = X_pred.reshape(len(X_pred), np.prod(X_pred.shape[1:]))
    autoencoder = load_model('model.h5')
    predicted = autoencoder.predict(X_pred)

    for i in range(100):
        plt.imsave("autoencoded/img{}_labael{}.png".format(i, X_label[i]), predicted[i].reshape(28, 28))

if __name__ == "__main__":
    action = sys.argv[1]
    dataset = sys.argv[2]

    if action == 'train':
        epochs = int(sys.argv[3])
        train(dataset, epochs)
    elif action == 'predict':
        predict(dataset)
Creating tasks using Fabric2
Now we'll attack the fabfile.py file where all the magic happens. To do so, I will explain the code contained inside this file fragment by fragment so you can get the logic behind it and how to use Fabric2 in general.
In this segment we import the main Frabric2 tools, which are the Connection class to connect to our remote server, the Config class to define some configuration linked to authentication and a function decorator, task, that makes Fabric2 functions (called tasks) recognizable when executing them on the shell, like fab2 fab-task. We will define four global variables for the username, the remote server ip-address, the location of the encryption key and our "secrets" (password and passphrase).
import json
from fabric2 import Connection, Config, task


SERVER_USER = '<username>'
SERVER_HOST = '<host_ip_address>'
SERVER_KEY = 'assets/server_ssh_key'

with open("assets/secrets.json") as f:
    ENV_VALUES = json.load(f)
    f.close()
Here we define a function to connect to our remote server and as you can see it specifies the password to use when using the sudo commands.
def connect_to_host(ctx):
    if isinstance(ctx, Connection):
        return ctx
    else:
        password = ENV_VALUES['password']
        config = Config(overrides={'sudo': {'password': password}})
        conn = Connection(ctx.host, ctx.user, connect_kwargs=ctx.connect_kwargs, config=config)
        return conn
This task defines the information of our remote server, so when using the connect_to_host with no previous established connection it will have what is needed to connect.
@task
def remote(ctx):
    ctx.user = SERVER_USER
    ctx.host = SERVER_HOST
    ctx.connect_kwargs.key_filename = SERVER_KEY
    ctx.connect_kwargs.passphrase = ENV_VALUES['passphrase']
For this one, we're simply updating our OS packages list and then installing all needed packages (like Python 3) so we can have a proper working OS. As you can notice, we're running shell commands as strings and we're mentioning that it has to run as a sudo by using conn.sudo("..."). To define the steps for this segment in words, this is what it does :
- Define information of the remote host.
- Connect to remote host.
- Update packages list as a sudo.
- Install needed packages as a sudo.
- Close connection.
Something to be mentioned, all tasks defined with an underscore get a hyphen when called in the shell for execution, so the task prepare_os when called is written as prepare-os.
@task
def prepare_os(ctx):
    remote(ctx)
    conn = connect_to_host(ctx)
    conn.sudo("apt-get update")
    conn.sudo("apt-get install -y python3 python3-pip python3-dev python3-venv")
    conn.sudo("apt-get install -y build-essential libssl-dev libffi-dev libpq-dev")
    conn.sudo("apt-get install -y zip unzip")
    conn.close()
Now we need a task to upload our machine learning assets and create a Python virtual environment containing all required libraries. Fabric2 doesn't offer folder uploading, so to get around this we will compress our ml_assets folder into a file then uploading it to be decompressed in the remote server. The shell commands here doesn't need to be run as a sudo this is why we're using conn.run(...), and for running commands in the local machine and not in the remote server we use conn.local(...).
This task does the following actions:
- Define information of the remote host.
- Connect to remote host.
- Compressing the
ml_assetsfolder. - Uploading the compressed file using
conn.put(<local_file>, <remote_folder>). - Decompressing the file in the remote server.
- Deleting the compressed file both locally and remotely.
- Create a Python virtual environment called
modelenv. - Upgrading
pipinsidemodelenv. - Installing required Python libraries contained inside
Requirements.txt. - Show the list of installed Python libraries.
- Close connection.
@task
def prepare_menv(ctx):
    remote(ctx)
    conn = connect_to_host(ctx)
    conn.local("zip -r ml_assets.zip ml_assets")
    conn.put('ml_assets.zip', '/home/{}/'.format(SERVER_USER))
    conn.run("unzip -o -q ml_assets.zip")
    conn.run("rm ml_assets.zip")
    conn.local("rm ml_assets.zip")
    conn.run("python3 -m venv modelenv")
    conn.run("./modelenv/bin/pip3 install --upgrade pip")
    conn.run("./modelenv/bin/pip3 install -r ./ml_assets/Requirements.txt")
    conn.run("./modelenv/bin/pip3 freeze")
    conn.close()
We're having the right OS and Python environment and all what is needed now is our main execution. This task does the training by calling our Python script model.py and defining the expected arguments to inform it that we're requesting a training, defining our dataset to be trained and the number of epochs. After the learning phase, we will download a copy of the model into our local machine using the conn.get(<remote_file>, <local_file>).
@task
def train_model(ctx, dataset, epochs):
    remote(ctx)
    conn = connect_to_host(ctx)
    conn.run("./modelenv/bin/python ./ml_assets/model.py train {0} {1}".format(dataset, epochs))
    conn.get("model.h5", "./ml_assets/model.h5")
    conn.run("rm model.h5")
    conn.close()
This task can be called as follow :
fab2 train-model --dataset=<link_to_train_data> --epochs=50
The last piece is the prediction, and it contains the following actions :
- Define information of the remote host.
- Connect to remote host.
- Upload the dataset for prediction to the remote server.
- Upload a copy of the model trained to the remote server.
- Make a folder called
autoencodedwhere we will save our autoencoded images. - Run prediction.
- Compressing the
autoencodedfolder. - Downloading the compressed file.
- Deleting the model copy, the prediction dataset, the
autoencodedfolder and its compressed file present in the remote server. - Decompressing locally the
autoencoded.zipfile. - Removing the compressed file.
- Close connection.
@task
def predict_data(ctx, dataset):
    remote(ctx)
    conn = connect_to_host(ctx)

    conn.put(dataset, '/home/{}/'.format(SERVER_USER))
    conn.put('./ml_assets/model.h5', '/home/{}/'.format(SERVER_USER))
    conn.run("mkdir -p autoencoded")
    conn.run("./modelenv/bin/python ./ml_assets/model.py predict {}".format(dataset))
    conn.run("zip -r autoencoded.zip autoencoded")
    conn.get('autoencoded.zip', 'autoencoded.zip'.format(SERVER_USER))
    conn.run("rm -rf autoencoded")
    conn.run("rm autoencoded.zip")
    conn.run("rm model.h5")
    conn.run("rm {}".format(dataset))
    conn.local("unzip -o -q autoencoded.zip")
    conn.local("rm autoencoded.zip")

    conn.close()
It is to mention that we distinguish between the training and the prediction. What I mean is those two processes can be run in two different servers. What is important, is during the prediction our copy of the model is present in the machine learning assets, which would be the case if we've run at least once the training task.
Automation in action
Now let us see how in practice this functions work by running each task and observe what are the ouputs!
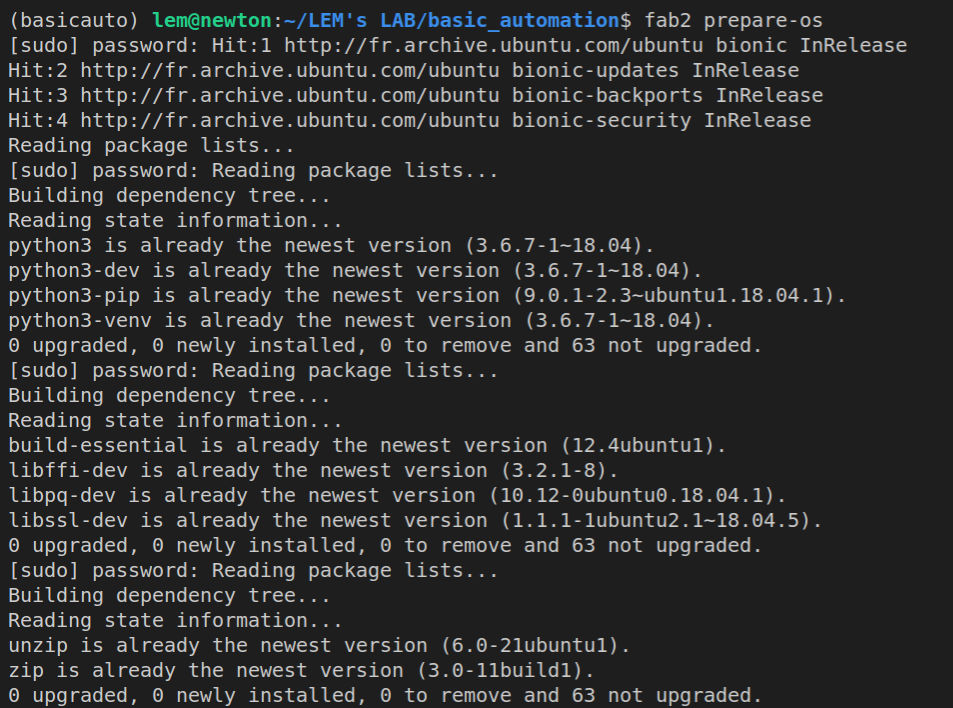
Preparing our remote host OS (Ubuntu 18.04 LTS)
fab2 prepare-os
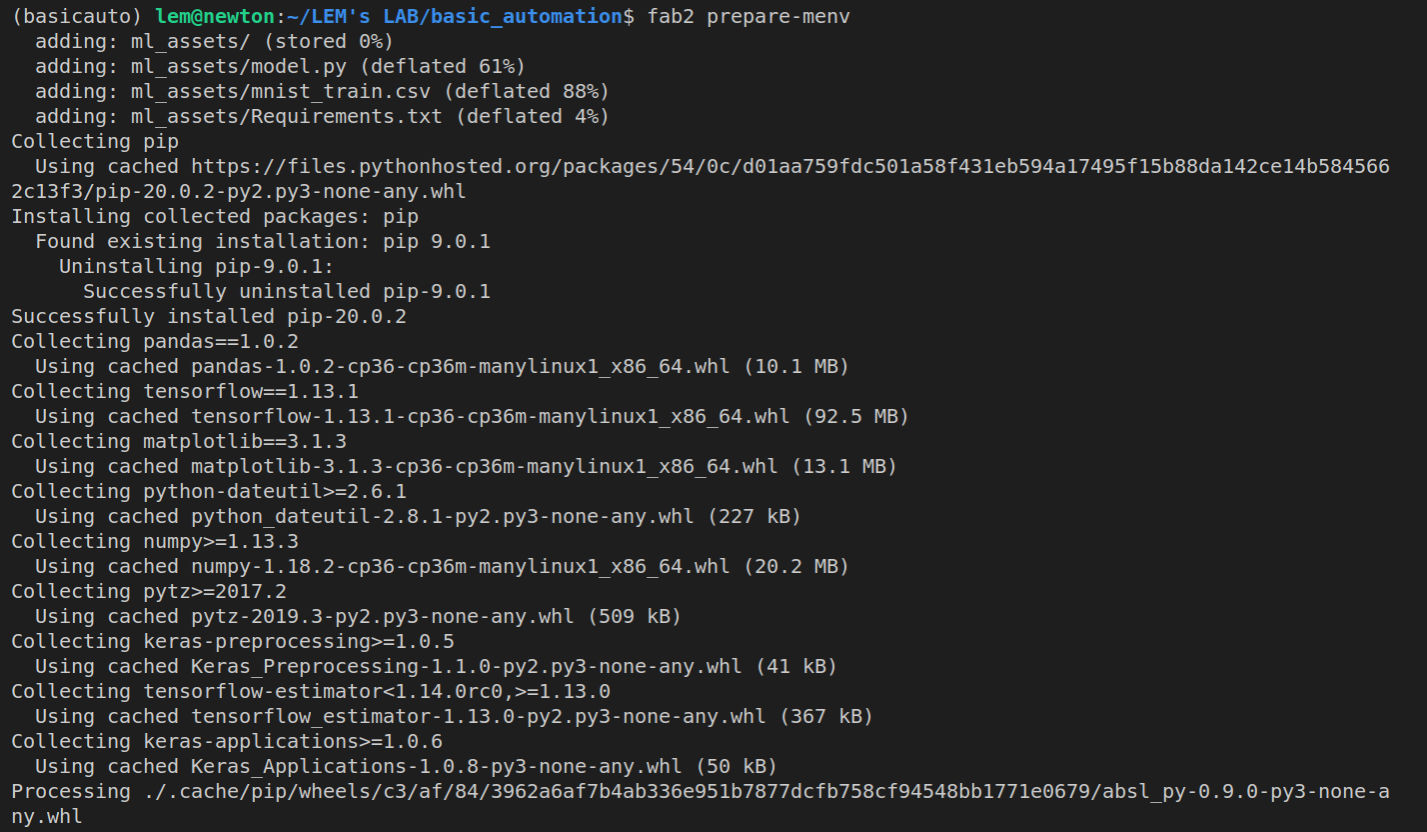
Uploading assets and preparing Python virtual environment
fab2 prepare-menv
Training the autoencoder
fab2 train-model --dataset=./ml_assets/mnist_train.csv --epochs=5

After this, the copy of the model is created locally :
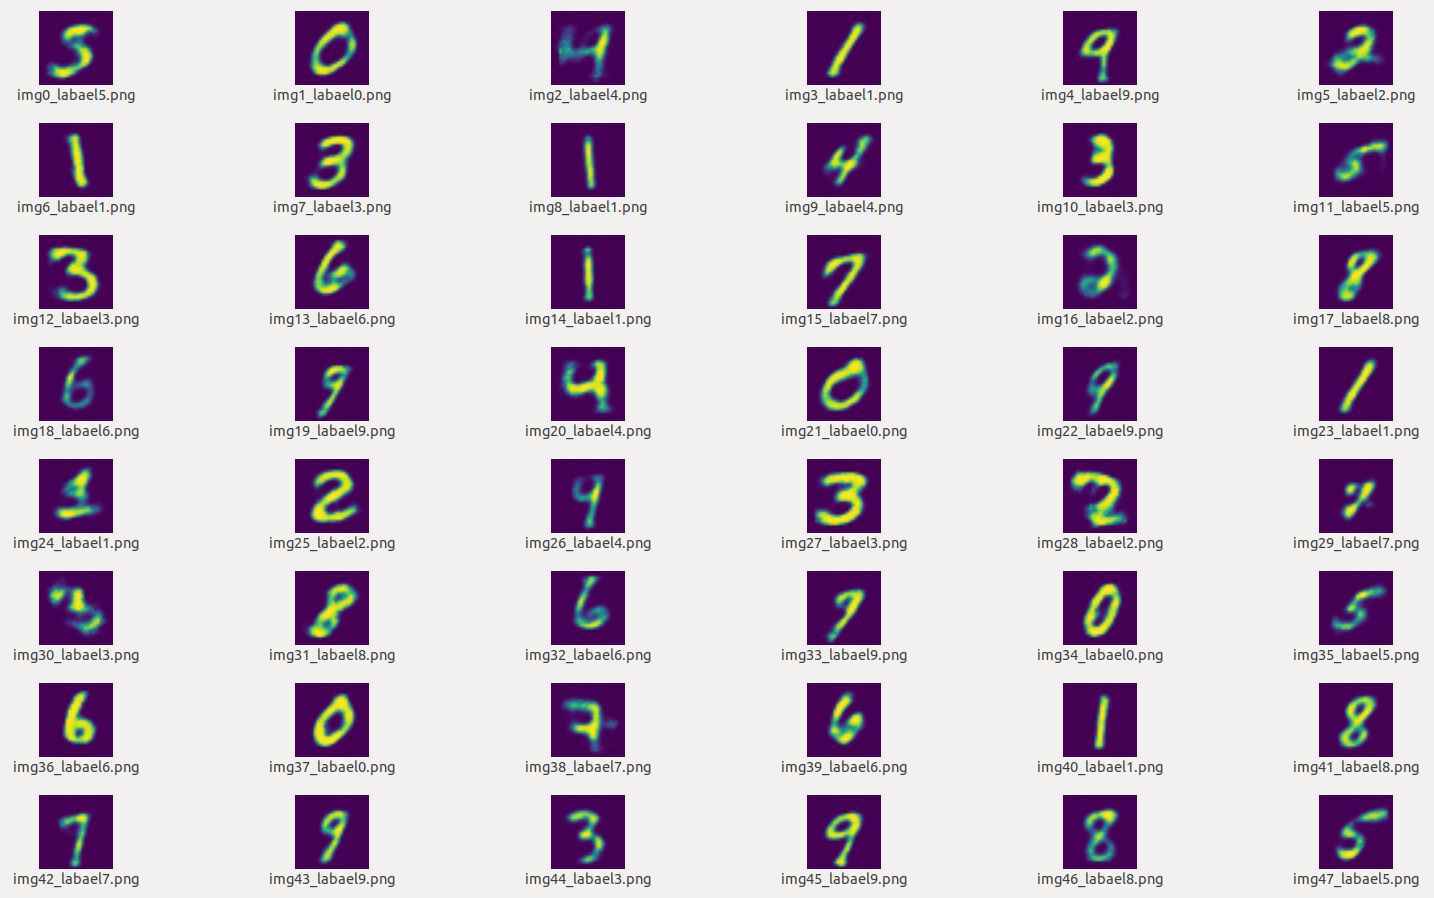
Creating autoencoded images
fab2 predict-data --dataset=./ml_assets/mnist_predict.csv
This code will create the autoencoded images locally as shown here bellow, and voilà!
That's all folks! Don't hesitate to follow me on Twitter!