Before starting, I have a quick disclaimer : This post is not a Docker tutorial but a post on how to use Docker to create a cluster on your own machine. If you've never heard of it before (which would be surprising) or you've never had the chance to play with it, I highly recommend you to watch this very great introductory video made by Mumshad Mannambeth. I've also made a very short and consistent cheat-sheet that you can refer to.
In addition to that, I will assume you already know what Dask, Spark, Yarn and Hadoop are all about. Again this isn't an introductory tutorial but more of a "cookbook", so to speak.
In case you're here for the code and want to have a turnkey cluster on your own machine don't hesitate to use my code on my git repo as you please.
When first learning Spark or Dask, we generally run them on our local machine, it is convenient and somehow simple but far from being a real life application scenario where we would be using distributed computations on many nodes. And sometime we want just to test one or two things on Spark or Dask, so we remember that we've deleted that standalone folder from last time or we've thrown away the python virtual environment where we've sweetly installed Dask and Pyspark and redoing configurations is a real pain in the a**.
Docker can be a good tool to make our life a bit easier regarding this, it can simulate a "real life" environment on your own machine, where we will harness its OS-level virtualization power to put Yarn, Spark and Dask on a 1-Master 2-Slaves cluster (more or less depending on your machine's power). The first reaction you may have, if you're not very familiar with Docker, is to ask why not using many virtual machines to do the job?! It is a valid question in my opinion and for that I have two answers: firstly Docker do virtualization too, but in a low level which means a high gain in terms of resources consumption, more room for ressources means more virtual machines (called containers), plus Docker's virtualization isn't the "objective" but just a mean to run application contained on virtual machines which brings me to my second point that Docker is a "Platform as a Service", or in a more cool-forced way a PaaS, which means the presence of a consistent API to run our containers and configure them without any hustle.
Cluster Architecture
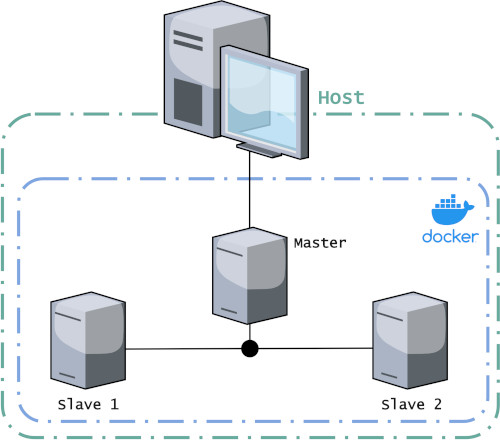
The architecture I'm imagining is a cluster with three nodes. One is a master, it won't do any "work" but will be sort of a manager to other nodes, plus it will host the web interfaces (a Jupyter notebook and the Yarn resource manager UI) that we'll be using to run and check our works on top of the cluster. The two other nodes are slaves (computer science can be harsh sometimes), they will do the heavy lift and execute any compute-map-reducy-machine-learny stuff we want them to do.
As presented in the following image, Docker is running inside the host (your own computer in less fashionable words) and will run three containers corresponding to the three nodes I've discussed before. This architecture depends on your resources (number of CPUs and quantity of RAM your machine has), you can go up to 6 nodes if you wish or go down to 2 nodes if your resources are limited.
Files Tree to Use
This project will be organized as follow :
├── docker-compose.yml
├── Dockerfile
├── confs
│   ├── config
│   ├── core-site.xml
│   ├── hdfs-site.xml
│   ├── mapred-site.xml
│   ├── requirements.req
│   ├── slaves
│   ├── spark-defaults.conf
│   └── yarn-site.xml
├── datasets
│   ├── alice_in_wonderland.txt
│   └── iris.csv
├── notebooks
│   ├── Bash-Interface.ipynb
│   ├── Dask-Yarn.ipynb
│   ├── Python-Spark.ipynb
│   └── Scala-Spark.ipynb
└── script_files
    └── bootstrap.sh
- docker-compose.yml : here where the magic happens, this file will contain all the set of directives that Docker will use to create the whole cluster, configure the network and set properties for each node.
- Dockerfile : this is what Docker use to create the image (OS + needed applications) that we'll use for our containers.
- confs : this folder will contain the configuration files for Hadoop, Yarn and Spark in addition to the requirements for python.
- datasets : this folder contains the "starter" datasets to use for experimenting with our cluster. I've chosen very small datasets to play with, remember this cluster is not for "real" work but just to test stuff.
- notebooks : those are the notebooks "starters", each one contains the basic commands to launch our cluster for Scala-Spark (the real Spark you say?!), Python-Spark (yeah, I know Pyspark...) and Dask. In addition to those three, there is a notebook running a Bash-Kernel so you can have an interface with the command shell.
- script_files : I will put here all the bash scripts to be executed. Right now, I have only one named
bootstrap.sh, it will be executed at each time the container is starting. I'll explain a bit further what it does exactly.
Resources & Preset configuration for Hadoop, Yarn & Spark
Configuration is a huge deal here, because of the resources you have. Remember, we're trying to simulate many nodes on one machine, so if you have for example 4 GB of RAM and a lonely CPU...I think better not to bother with all this and stick to whatever is running on your machine. But if you happen to have like 16 GB of RAM and 4 cores or more, yeah go ahead this will give you the ability to simulate a cluster, if you don't have any within your reach (even 8 GB can do the job but you have to limit yourself to one slave node...) .
That's been said, I will introduce here the default configuration I've used to run the three nodes, and you can of course change them so it can suit your needs and machine limits.
spark-defaults.conf (Spark)
# We inform Spark that it has to use Yarn
spark.master                     yarn
# Client mode is important so we can interact with Spark using Jupyter
spark.submit.deployMode          client
# Spark driver and executor memory
spark.driver.memory              512m
spark.executor.memory            512m
# This has to be lower than yarn.nodemanager.resource.memory-mb (inside yarn-site.xml)
spark.yarn.am.memory             1G
slave (Yarn/Hadoop), here we define the names of our salves, as we will see it further those names are defined at the level of the docker-compose.yml file. The internal Docker DNS manages to match those names with their respective machines.
node-slave1
node-slave2
core-site.xml (Yarn/Hadoop), we're defining here the Master Node's name ("the host") and the port for using HDFS communication. In this case my Master Node name is node-master and the HDFS port is 9000.
<?xml version="1.0" encoding="UTF-8"?>
<?xml-stylesheet type="text/xsl" href="configuration.xsl"?>

<configuration>
        <property>
            <name>fs.default.name</name>
            <value>hdfs://node-master:9000</value>
        </property>
</configuration>
hdfs-site.xml (Hadoop), we are definging here some properties related to the HDFS system. We've set the number of replication (dfs.replication) to be equal to the number of nodes, in this case 2 means each file will be duplicated through the cluster. Other than that, we are simply setting the directory for the namenode and the datanode.
<?xml version="1.0" encoding="UTF-8"?>
<?xml-stylesheet type="text/xsl" href="configuration.xsl"?>

<configuration>
     <property>
            <name>dfs.namenode.name.dir</name>
            <value>/opt/hadoop/data/nameNode</value>
    </property>
    <property>
            <name>dfs.datanode.data.dir</name>
            <value>/opt/hadoop/data/dataNode</value>
    </property>
    <property>
            <name>dfs.replication</name>
            <value>2</value>
    </property>
</configuration>
yarn-site.xml (Yarn), here we're setting Yarn's resources consumption and indicating who's the Master Node. Each slave will then use only one core (yarn.nodemanager.resource.cpu-vcores), and a maximum memory of 1536 MB (yarn.nodemanager.resource.memory-mb).
<?xml version="1.0"?>
<configuration>
        <property>
                <name>yarn.acl.enable</name>
                <value>0</value>
        </property>
        <property>
                <name>yarn.resourcemanager.hostname</name>
                <value>node-master</value>
        </property>
        <property>
                <name>yarn.nodemanager.aux-services</name>
                <value>mapreduce_shuffle</value>
        </property>
        <property>
                <name>yarn.nodemanager.resource.cpu-vcores</name>
                <value>1</value>
        </property>
        <property>
                <name>yarn.nodemanager.resource.memory-mb</name>
                <value>1536</value>
        </property>
        <property>
                <name>yarn.scheduler.minimum-allocation-mb</name>
                <value>256</value>
        </property>
        <property>
                <name>yarn.scheduler.maximum-allocation-mb</name>
                <value>1536</value>
        </property>
        <property>
                <name>yarn.nodemanager.vmem-check-enabled</name>
                <value>false</value>
        </property>
</configuration>
mapred-site.xml (Yarn/Hadoop), this time it is the map and reduce processing we're configuring.
<?xml version="1.0"?>
<?xml-stylesheet type="text/xsl" href="configuration.xsl"?>

<configuration>
  <property>
      <name>mapreduce.framework.name</name>
      <value>yarn</value>
  </property>
  <property>
      <name>yarn.app.mapreduce.am.env</name>
      <value>HADOOP_MAPRED_HOME=$HADOOP_HOME</value>
  </property>
  <property>
      <name>mapreduce.map.env</name>
      <value>HADOOP_MAPRED_HOME=$HADOOP_HOME</value>
  </property>
  <property>
      <name>mapreduce.reduce.env</name>
      <value>HADOOP_MAPRED_HOME=$HADOOP_HOME</value>
  </property>
  <property>
      <name>yarn.app.mapreduce.am.resource.mb</name>
      <value>1536</value>
    </property>
  <property>
      <name>yarn.app.mapreduce.am.command-opts</name>
      <value>400</value>
    </property>
    <property>
        <name>mapreduce.map.memory.mb</name>
        <value>256</value>
    </property>
    <property>
        <name>mapreduce.reduce.memory.mb</name>
        <value>256</value>
    </property>
  <property>
      <name>mapreduce.map.java.opts</name>
        <value>200</value>
    </property>
  <property>
        <name>mapreduce.reduce.java.opts</name>
        <value>400</value>
    </property>
</configuration>
If you don't know how to choose the right values that matches your resources, Cloudera has this article explaining some heuristics to be used.
Creating the Base Image
Now we need a special "distribution" (called an image in the Docker jargon) that we will run on our three containers, it must include the necessary applications and configurations so we can have a little sweet OS with Python, Spark, Hadoop & Yarn and all friends on it!
To do this, we will put the necessary instruction inside the file named Dockerfile. We start by specifying what is the base OS/Image to use, in our case it would be an Ubuntu Bionic Beaver also known as Ubuntu 18.04 LTS.
FROM ubuntu:bionic
Right after we will define all necessary environment variables for the (to be) running session. The comments explain the role of each line.
# showing to hadoop and spark where to find java!
ENV JAVA_HOME /usr/lib/jvm/java-1.8.0-openjdk-amd64/jre

# after downloading hadoop (a bit further) we have to inform any concerned
# app where to find it
ENV HADOOP_HOME /opt/hadoop

# same for the hadoop configuration
ENV HADOOP_CONF_DIR /opt/hadoop/etc/hadoop

# and same for spark
ENV SPARK_HOME /opt/spark

# with this we can run all hadoop and spark scripts and commands directly from the shell
# without using the absolute path
ENV PATH="${HADOOP_HOME}/bin:${HADOOP_HOME}/sbin:${SPARK_HOME}/bin:${SPARK_HOME}/sbin:${PATH}"

# just informing the hadoop version, this isn't really necessary
ENV HADOOP_VERSION 2.7.0

# if you happend to run pyspark from shell, it will launch it on a Jupyter Notebook
# this is just two fancy lines, really no need for it
ENV PYSPARK_DRIVER_PYTHON=jupyter
ENV PYSPARK_DRIVER_PYTHON_OPTS='notebook'

# showing pyspark which "python" command to use
ENV PYSPARK_PYTHON=python3
We will now update the OS; install Java, an SSH server and Python (including pip and other dependencies). You can also see that we've installed wget (to download from urls) and nano (to access and modify files), it may seem weird but the basic distribution used by Docker ubuntu:bionic is very very lean and contains only what is necessary to define the distribution itself.
RUN apt-get update && \
    apt-get install -y wget nano openjdk-8-jdk ssh openssh-server
RUN apt update && apt install -y python3 python3-pip python3-dev build-essential libssl-dev libffi-dev libpq-dev
Now we will copy the requirements file inside the image and then install them on Python.
COPY /confs/requirements.req /
RUN pip3 install -r requirements.req
RUN pip3 install dask[bag] --upgrade
RUN pip3 install --upgrade toree
RUN python3 -m bash_kernel.install
It is time to download Hadoop and Spark and extract each one of them into its specific folder.
RUN wget -P /tmp/ https://archive.apache.org/dist/hadoop/common/hadoop-2.7.0/hadoop-2.7.0.tar.gz
RUN tar xvf /tmp/hadoop-2.7.0.tar.gz -C /tmp && \
    mv /tmp/hadoop-2.7.0 /opt/hadoop

RUN wget -P /tmp/ http://mirror.ibcp.fr/pub/apache/spark/spark-2.4.4/spark-2.4.4-bin-hadoop2.7.tgz
RUN tar xvf /tmp/spark-2.4.4-bin-hadoop2.7.tgz -C /tmp && \
    mv /tmp/spark-2.4.4-bin-hadoop2.7 ${SPARK_HOME}
We need to generate an SSH key to allow communication between our containers as expected by Hadoop and Spark. Just to clarify something, installing Hadoop is necessary to run Yarn and using the HDFS.
RUN ssh-keygen -t rsa -P '' -f ~/.ssh/id_rsa && \
    cat ~/.ssh/id_rsa.pub >> ~/.ssh/authorized_keys && \
    chmod 600 ~/.ssh/authorized_keys
COPY /confs/config /root/.ssh
RUN chmod 600 /root/.ssh/config
Now we will copy the preset configurations and the ENTRYPOINT script ( a script to be executed each time we will run a container with this image).
COPY /confs/*.xml /opt/hadoop/etc/hadoop/
COPY /confs/slaves /opt/hadoop/etc/hadoop/
COPY /script_files/bootstrap.sh /
COPY /confs/spark-defaults.conf ${SPARK_HOME}/conf
Exposing ports so the container can listen to them, by default it's a TCP port.
EXPOSE 9000
EXPOSE 7077
EXPOSE 4040
EXPOSE 8020
EXPOSE 22
Finally we will copy the starters (notebooks and datasets) and specify the command to run as the ENTRYPOINT of our image, in our case it's simply running the bootstrap.sh script.
RUN mkdir lab
COPY notebooks/*.ipynb /root/lab/
COPY datasets /root/lab/datasets

ENTRYPOINT ["/bin/bash", "bootstrap.sh"]
The bootstrap.sh script is doing four things :
- Formating the namenode to support HDFS.
- Running the SSH client.
- Check if we are at the Master Node or not, if it's the case it will start Hadoop, Yarn and run Jupypter (properly so no tokens or passwords are needed).
- Launch an empty loop so our node will reamin up without terminating the container.
#!/bin/bash

hdfs namenode -format
service ssh start
if [ "$HOSTNAME" = node-master ]; then
    start-dfs.sh
    start-yarn.sh
    cd /root/lab
    jupyter trust Bash-Interface.ipynb
    jupyter trust Dask-Yarn.ipynb
    jupyter trust Python-Spark.ipynb
    jupyter trust Scala-Spark.ipynb
    jupyter notebook --ip=0.0.0.0 --port=8888 --no-browser --allow-root --NotebookApp.token='' --NotebookApp.password='' &
fi

while :; do :; done & kill -STOP $! && wait $!
Using all this chunks, the final Dockerfile has to be like this :
FROM ubuntu:bionic

ENV JAVA_HOME /usr/lib/jvm/java-1.8.0-openjdk-amd64/jre
ENV HADOOP_HOME /opt/hadoop
ENV HADOOP_CONF_DIR /opt/hadoop/etc/hadoop
ENV SPARK_HOME /opt/spark
ENV PATH="${HADOOP_HOME}/bin:${HADOOP_HOME}/sbin:${SPARK_HOME}/bin:${SPARK_HOME}/sbin:${PATH}"
ENV HADOOP_VERSION 2.7.0
ENV PYSPARK_DRIVER_PYTHON=jupyter
ENV PYSPARK_DRIVER_PYTHON_OPTS='notebook'
ENV PYSPARK_PYTHON=python3

RUN apt-get update && \
    apt-get install -y wget nano openjdk-8-jdk ssh openssh-server
RUN apt update && apt install -y python3 python3-pip python3-dev build-essential libssl-dev libffi-dev libpq-dev

COPY /confs/requirements.req /
RUN pip3 install -r requirements.req
RUN pip3 install dask[bag] --upgrade
RUN pip3 install --upgrade toree
RUN python3 -m bash_kernel.install

RUN wget -P /tmp/ https://archive.apache.org/dist/hadoop/common/hadoop-2.7.0/hadoop-2.7.0.tar.gz
RUN tar xvf /tmp/hadoop-2.7.0.tar.gz -C /tmp && \
    mv /tmp/hadoop-2.7.0 /opt/hadoop

RUN wget -P /tmp/ http://mirror.ibcp.fr/pub/apache/spark/spark-2.4.4/spark-2.4.4-bin-hadoop2.7.tgz
RUN tar xvf /tmp/spark-2.4.4-bin-hadoop2.7.tgz -C /tmp && \
    mv /tmp/spark-2.4.4-bin-hadoop2.7 ${SPARK_HOME}

RUN ssh-keygen -t rsa -P '' -f ~/.ssh/id_rsa && \
    cat ~/.ssh/id_rsa.pub >> ~/.ssh/authorized_keys && \
    chmod 600 ~/.ssh/authorized_keys
COPY /confs/config /root/.ssh
RUN chmod 600 /root/.ssh/config

COPY /confs/*.xml /opt/hadoop/etc/hadoop/
COPY /confs/slaves /opt/hadoop/etc/hadoop/
COPY /script_files/bootstrap.sh /
COPY /confs/spark-defaults.conf ${SPARK_HOME}/conf

RUN jupyter toree install --spark_home=${SPARK_HOME}
RUN echo "export JAVA_HOME=${JAVA_HOME}" >> /etc/environment

EXPOSE 9000
EXPOSE 7077
EXPOSE 4040
EXPOSE 8020
EXPOSE 22

RUN mkdir lab
COPY notebooks/*.ipynb /root/lab/
COPY datasets /root/lab/datasets

ENTRYPOINT ["/bin/bash", "bootstrap.sh"]
Now we need to build our image, and to do that we simply run the following command at the same folder level as the Dockerfile :
docker build . -t cluster-base
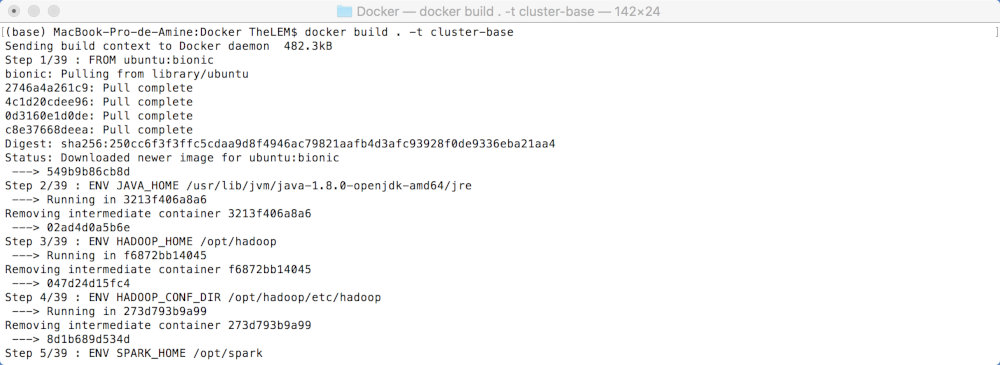
It is very important that the image name used here (cluster-base) matches the specified image name on the docker-compose.yml file.
Docker Compose or how to make the cluster comes to life
Instead of launching and configuring each node independently, Docker Compose facilitates doing this by specifying the characteristics of all our nodes, and by characteristics I mean the image to use, the hostname to set, the network to be part of and anything that you can more or less write down using Docker command lines.
Bellow is the YAML file I've used, I will add comments to it so you can undesrtand what it does.
version: "3.3"
# Here we will list all nodes/containers!
services:
# First container will be named node-master
  node-master:
# We will tell Docker to run the slaves first before running the Master Node
    depends_on:
      - node-slave1
      - node-slave2
# The image to be used is the image we've built before
    image: cluster-base:latest
# It explains itself, what it the container name
    container_name: node-master
# The hostname for this container
    hostname: node-master
# Connecting your terminal to the stdin and stdout stream of the container so you can see
# all the messages it outputs
    tty: true
# Ports redirection to Host
    ports:
      - "8088:8088"
      - "50070:50070"
      - "50030:50030"
      - "8080:8080"
      - "8042:8042"
      - "8888:8888"
# Linking this container to the following network and defining an alias to be used
    networks:
      cluster-network:
        aliases:
          - node-master
# First Slave Node, same thing as previously seen
  node-slave1:
    image: cluster-base:latest
    container_name: node-slave1
    hostname: node-slave1
    tty: true
    ports:
      - "7042:8042"
    networks:
      cluster-network:
        aliases:
          - node-slave1
# Second Slave Node
  node-slave2:
    image: cluster-base:latest
    container_name: node-slave2
    hostname: node-slave2
    tty: true
    ports:
      - "9042:8042"
    networks:
      cluster-network:
        aliases:
          - node-slave2
# Defining a new network of Bridge type to be created
networks:
  cluster-network:
    driver: bridge
    ipam:
      driver: default
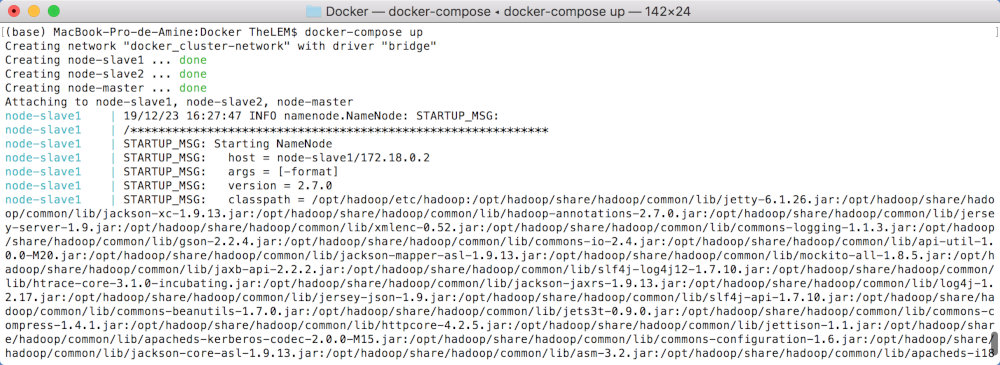
To run the cluster and launch it, all is needed now is to run the command bellow at the same folder level as the docker-compose.yml:
docker-compose up
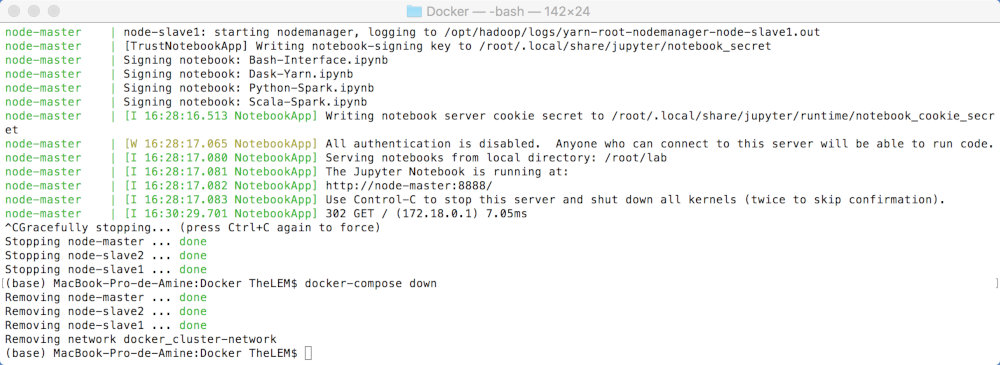
Now that your cluster is up and running you should have something like this, displayed on your shell :
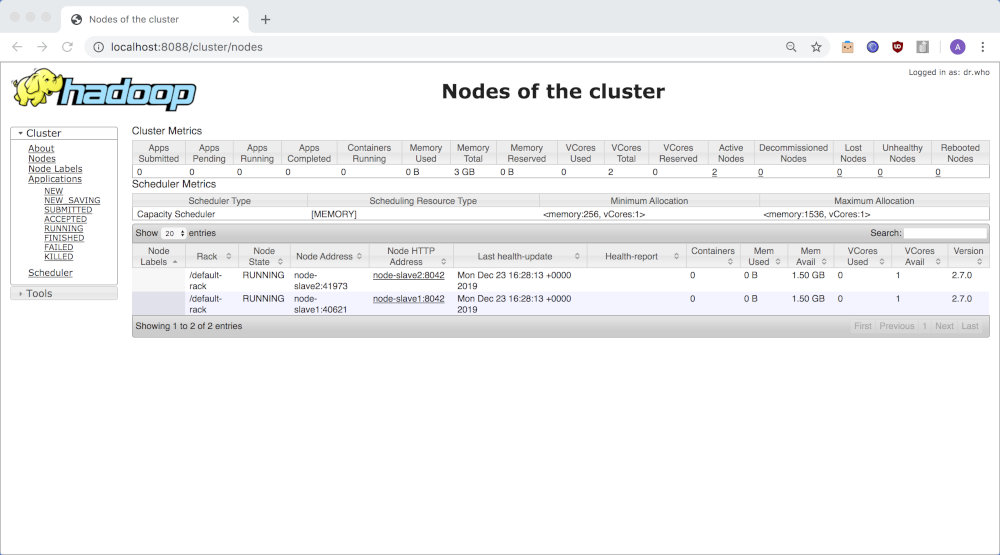
You can even access Yarn resource manager UI to see the slave nodes part of your cluster (localhost:8088/cluster/nodes).
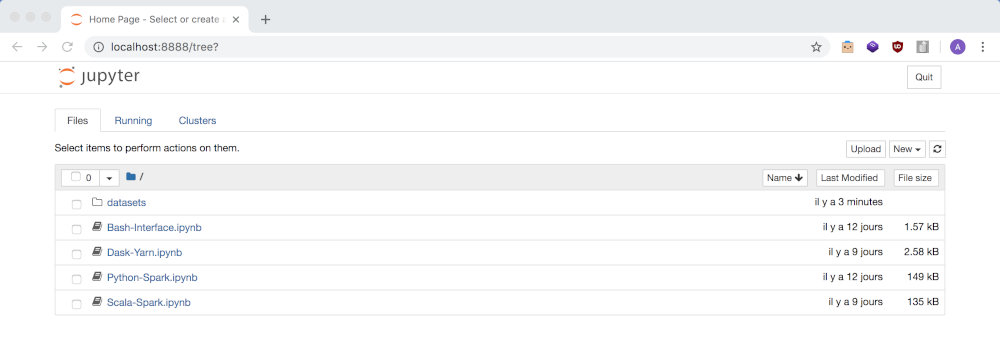
And now you can access Jupyter Notebook at localhost:8888. You can use the starter notebooks and start playing arround with Spark (Scala or Python) and Dask :
For stopping your cluster use Ctrl + C and then run the command docker-compose down to completly remove the containers.
That's all folks! Don't hesitate to follow me on Twitter!